This Delicate Dreams thank you card is not what you expected.
When most people hear “Delicate Dreams” they picture soft, pretty pastels. And that’s exactly why I went a completely different direction.
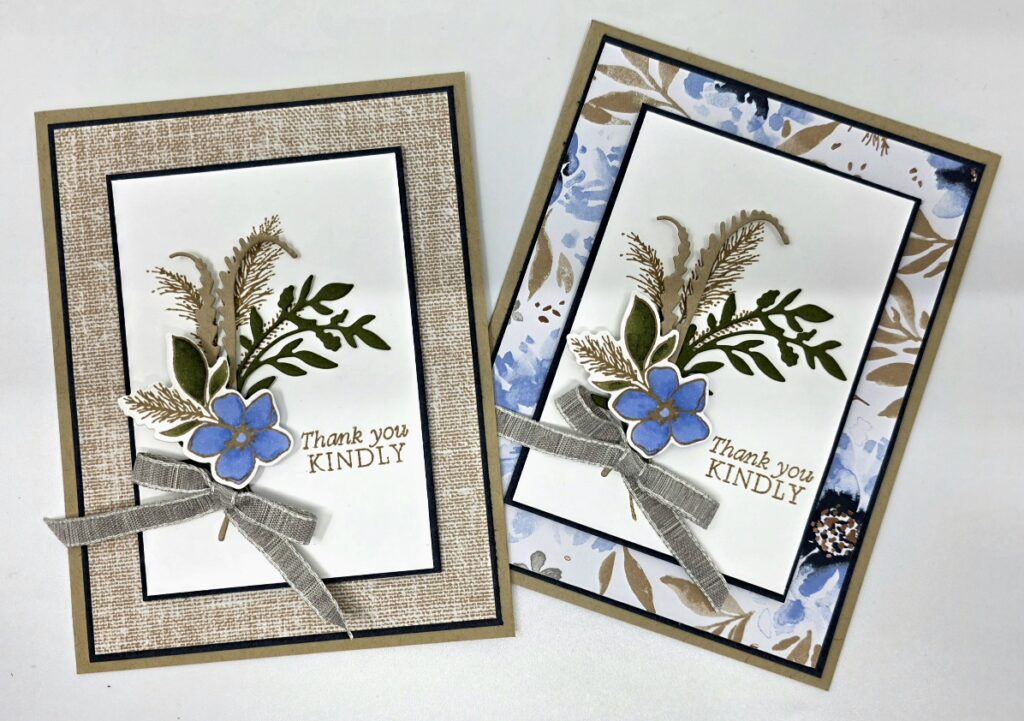
This Thank You card uses the Delicate Dreams suite from the new Stampin’ Up! catalog — but instead of reaching for the soft florals, I built around Craft, Secret Sea, and a single pop of Hydrangea Blue. The result surprised even me. And then I made a second version using the floral side of the Designer Series Paper, just to see what would happen.
Spoiler: I couldn’t pick a favorite either. Keep reading to see both — and tell me which one you’d actually send.
Watch the Delicate Dreams Thank You Card Tutorial
The Craft + Secret Sea Version

This is the one that started it all. The burlap-texture side of the Delicate Dreams DSP pairs beautifully with Crumb Cake and Secret Sea. The botanical cluster is built from Delicate Whispers dies — Mossy Meadow Leaf Spray, two Crumb Cake Spikes, and a stamped and colored flower using Hydrangea Blue Stampin’ Blends.

The Gray Granite ribbon pulls the whole thing together without competing with the color palette. Twelve inches, tied into a simple bow at the base of the cluster.
The Floral DSP Version

After finishing the first card I flipped the DSP over — and the floral side completely changed the personality of the design. Same card base, same layers, same botanical cluster. Just a different face on the Designer Series Paper.
This version feels a little softer and more romantic, while the Craft version feels more earthy and unexpected. Both use identical construction — which means once you make one, the second takes about ten minutes.
How to Make This Delicate Dreams Thank You Card
All the cutting measurements, supplies, and step-by-step instructions are in the downloadable PDF below.
[INSERT tutorial document download link]
Supplies used:
- Delicate Whispers Bundle (stamp set + dies)
- Delicate Dreams Designer Series Paper
- Crumb Cake cardstock
- Secret Sea cardstock
- Basic White cardstock
- Crumb Cake ink
- Hydrangea Blue Stampin’ Blends (light + dark)
- Mossy Meadow Stampin’ Blends (light + dark)
- Gray Granite Ribbon
- Stampin’ Dimensionals
Tips for Making This Card
- Stamp the leaf spray image lightly with Crumb Cake ink for a soft, tone-on-tone effect against the white panel
- Cut two Spikes dies and layer them at slightly different angles for a more natural botanical look
- Apply Stampin’ Blends dark marker first, then layer the light marker while the light is still wet — this blends the color seamlessly without hard edges
- The flower die cut is easier to handle if you let the Blends dry completely before running it through the die cut machine
- Use Stampin’ Dimensionals under every element of the botanical cluster for maximum dimension — flat elements on this design lose the layered effect entirely
Which version would you send?
Leave a comment below — I genuinely want to know. The Craft version or the floral DSP version?
And if you want to make this card along with me every month, check out Club Create — my monthly card kit and class delivered right to your door.
Happy Stampin’
Karen