If someone told you to put purple and gold together on a beach card, you might think they’d lost their mind. But trust me on this one — the Stampin’ Up! Sunset Coast Bundle makes this color combination absolutely stunning, and it’s one of the easiest cards you’ll ever make with it. The dies and designer paper do all the work for you, and the result is a genuine WOW card every single time.
Watch the full Sunset Coast Bundle tutorial here:
What You’ll Need for This Sunset Coast Bundle Card
Stampin’ Up! Sunset Coast Bundle Supplies:
- Sunset Coast Bundle
- Scenic Coast Designer Series Paper
- Highland Heather Cardstock
- Basic White Cardstock
- Crushed Curry Cardstock (for seashells and starfish)
- Forever Plaid Embossing Folder
- Black Dimensionals
- Stampin’ Dimensionals
- Liquid Glue
- Sunset Sparkle Adhesive Sequins
How to Make This Card
Step 1: Start with Your Card Base
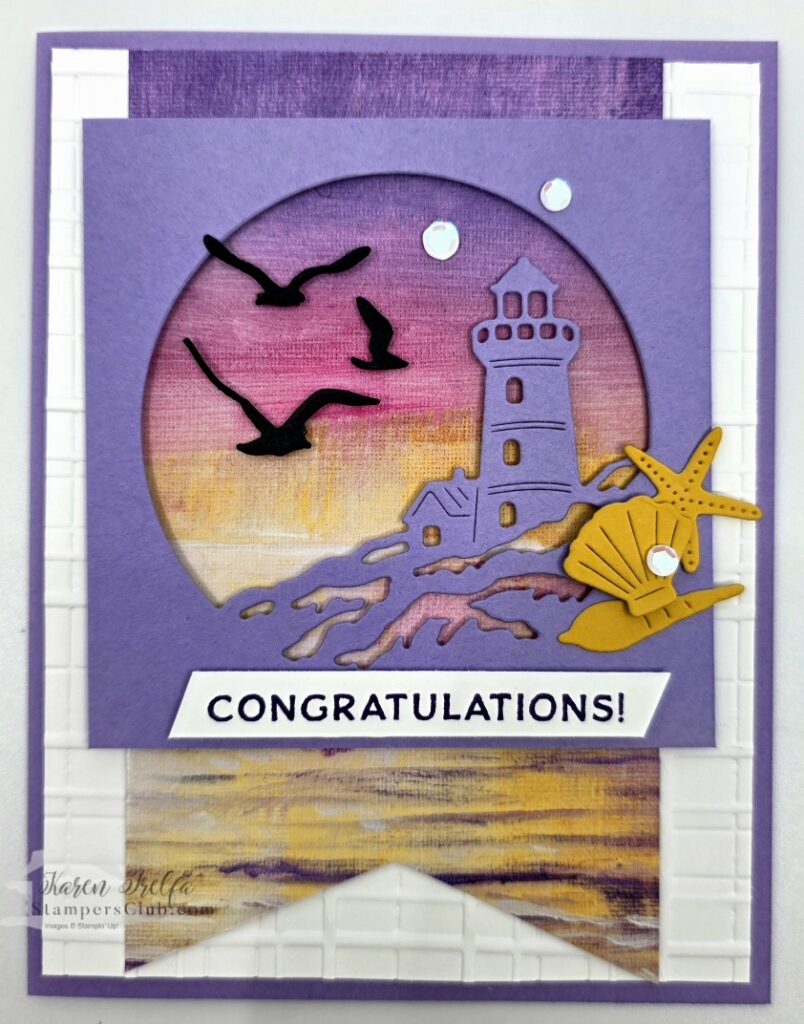
Start with a half sheet of Highland Heather cardstock scored at 4¼ inches. Fold it in half and burnish with your bone folder for a crisp edge.
Step 2: Add the Embossed White Layer
Cut a piece of Basic White cardstock and run it through your Stampin’ Cut & Emboss Machine with the Forever Plaid embossing folder. This adds beautiful texture and dimension as your base layer — it’s a stamp room staple!
Step 3: Add the Designer Series Paper Banner
Here’s where the magic happens. Cut a piece of the Scenic Coast Designer Series Paper — this is the purple and gold shimmer sheet included in the Sunset Coast Bundle that does all the work for you.
Fold it in half, pinch at the bottom edge, then use scissors to cut from above the fold diagonally to the opposite corner where the two pieces meet. This gives you a perfectly centered banner point every time. Attach it right in the center over your embossed white layer.
Step 4: Die Cut the Lighthouse Scene
Cut a piece of Highland Heather cardstock and run it through your Big Shot with the lighthouse die from the Sunset Coast Bundle die set. Apply Stampin’ Dimensionals around the edges and through the center so the entire piece is well supported, then pop it right over the designer paper banner. You’ll instantly see that gorgeous sunset peeking through the background.
Step 5: Add the Crushed Curry Seashells
Die cut the seashells from Crushed Curry cardstock. Apply a small amount of liquid glue to the starfish and seashell and place them at the lower right of the lighthouse scene. Add a dimensional to the back of the scallop shell for extra depth, then layer it in front of the starfish.
Step 6: Place the Seagulls
Die cut three seagulls from Basic Black cardstock. Use black dimensionals (cut into smaller pieces as needed) to mount each seagull at varying heights across the left side of the scene. The black dimensionals are a great trick — they disappear completely against the black die cuts so you never see the foam underneath.

Step 7: Stamp Your Greeting
Stamp “CONGRATULATIONS!” on Basic White cardstock. Snip the ends at an angle on both sides to create a simple banner shape. Add dimensionals to the back and pop it onto the lower portion of the card.
Step 8: Finish with Sequins
Add adhesive-back sequins from the Scenic Coast suite — one larger sequin near the top and two smaller ones on the card for sparkle and shimmer. And that’s it — your Sunset Coast Bundle card is completely finished!

Why This Color Combination Works
Purple and gold sounds unexpected for a beach card, but the Scenic Coast Designer Series Paper does the heavy lifting. The shimmer in the paper catches the light beautifully, and the Crushed Curry seashells echo the gold tones perfectly. It’s a WOW card that comes together in minutes.
Shop the Supplies
Get everything you need to make this card right here:
Want More Card Tutorials Like This?
Place a $50+ Stampin’ Up! order through me and you’ll earn a spot in my free monthly Discovery Card Class — my way of saying thank you!
Or if you’re ready to go deeper, check out Club Create — my monthly card class for cardmakers who want WOW-level results every month.